Able Photo Resizer - How to use?
How to Resize Photo, Resize Image and Resize Pictures.
1) Files tab.

To add files to the list, click the "Add files" button. The Windows Open Dialog appears. Select files and click the "Open" button to add them to the file list. You can use "Shift" and "Control" keys to add several files at a time.
Note: Instead of using the "Add files" button, you may drag-and-drop files directly to the list with the help of Explorer.
Able Photo Resizer also enables to add a folder to the file
list.
Just click "Add folder" button and select the desired
folder. You can also check "Include sub-folders" option
to add all files within the directory and use "File type"
filter to add files of the specific format.
You can remove any file from the list using "Remove" button.
You can also remove all files from the list using "Clear All" button.
To view an image from the list, you can select a necessary file by clicking on it.
If you did not finished working on files, you can always save you current File list using "Save list" button. And you can load it later using "Load list" button.
2) Parameters tab.
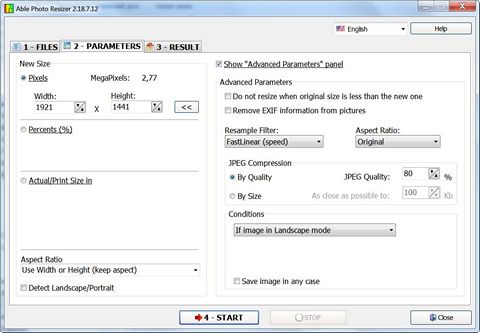
You can resize an image by adjusting its dimensions in pixels, percentage, or actual/print size. While resizing, you can also choose an aspect ratio and a resampling filter to adjust the resized image's appearance.
"New size" panel.
Select one of following resize options:
![]() Pixels: resizes the image to specific dimensions in pixels.
Pixels: resizes the image to specific dimensions in pixels.
![]() Percent: resizes the image to a percentage of the original.
Percent: resizes the image to a percentage of the original.
![]() Actual/Print size in: resizes the image to match a specific
output size.
Actual/Print size in: resizes the image to match a specific
output size.
Click the drop-down list to specify a unit of measurement.
Type image's new dimensions into Width and Height spin boxes. If you selected Actual/Print size in, click the Resolution drop-down list, and then select a resolution (in dots per inch) for your output image.
Choose one of the following options:
![]() "Use Width and Height": both Height and Width will be
used to resize an image (without keeping aspect)
"Use Width and Height": both Height and Width will be
used to resize an image (without keeping aspect)
![]() "Use Width (keep aspect)": Width will be used to calculate
new Height (keeping aspect)
"Use Width (keep aspect)": Width will be used to calculate
new Height (keeping aspect)
![]() "Use Height (keep aspect)": Height will be used to calculate
new Width (keeping aspect)
"Use Height (keep aspect)": Height will be used to calculate
new Width (keeping aspect)
![]() "Use Width or Height (keep aspect)": both Height and
Width will be used to resize an image (with keeping aspect)
"Use Width or Height (keep aspect)": both Height and
Width will be used to resize an image (with keeping aspect)
Detect Landscape/Portrait: Base the orientation of the original image.
Advanced parameters.
Remove EXIF information:
Most cameras add information about aperture, light, comments
and much more to the photo. You can delete this to reduce the
file size even more.
If you want to maintain a specific width to height ratio, select one of following options from the "Aspect Ratio" drop-down list:
![]() Original: maintains the original image's width to height
ratio.
Original: maintains the original image's width to height
ratio.
![]() 1 x 1: forces the width and height to be equal.
1 x 1: forces the width and height to be equal.
![]() 2 x 3: forces a width to height ratio of 2:3.
2 x 3: forces a width to height ratio of 2:3.
![]() 3 x 2: forces a width to height ratio of 3:2.
3 x 2: forces a width to height ratio of 3:2.
![]() 3 x 4: forces a width to height ratio of 3:4.
3 x 4: forces a width to height ratio of 3:4.
![]() 4 x 3 forces a width to height ratio of 4:3.
4 x 3 forces a width to height ratio of 4:3.
![]() 3 x 5: forces a width to height ratio of 3:5.
3 x 5: forces a width to height ratio of 3:5.
![]() 5 x 3 forces a width to height ratio of 5:3.
5 x 3 forces a width to height ratio of 5:3.
![]() 16 x 9 forces a width to height ratio of 16:9.
16 x 9 forces a width to height ratio of 16:9.
Select a resample filter from the "Resample Filter" drop-down list.
JPEG Compression: JPEG images can be compressed with different compression ratios. The more compressed the image is, more compression artifacts you see, and the less compressed the image is, the more time will it take for the viewer to load from the web.
![]() By quality: Set the fixed value of the compression strength.
The bigger is the value, the better is the quality and the size
it is. With this setting, images that have more small details
will be bigger in size than those that have not (for example,
picture of trees will be bigger than a picture of sky). If you
don't know what to set, the recommended default value it 80.
By quality: Set the fixed value of the compression strength.
The bigger is the value, the better is the quality and the size
it is. With this setting, images that have more small details
will be bigger in size than those that have not (for example,
picture of trees will be bigger than a picture of sky). If you
don't know what to set, the recommended default value it 80.
![]() By size: Here you can set a fixed size in kilobytes that the
size of output JPEG files will be less or equal to. Less detailed
pictures will be compressed with better quality, and all pictures
processed with the same By size setting will take exactly the
same time for a viewer to load form the web. For example, the
recommended size for a 640 by 480 pixels image is about 60 -
70 KB for fine quality, and about 90 - 100 KB for a quality
that in most cases will look like perfect.
By size: Here you can set a fixed size in kilobytes that the
size of output JPEG files will be less or equal to. Less detailed
pictures will be compressed with better quality, and all pictures
processed with the same By size setting will take exactly the
same time for a viewer to load form the web. For example, the
recommended size for a 640 by 480 pixels image is about 60 -
70 KB for fine quality, and about 90 - 100 KB for a quality
that in most cases will look like perfect.
Note. If the picture looks bad, it means that you've set a too low value of size/quality.
Conditions.
You can resize all images or select
requested condition from the drop-down list.
![]() All images
All images
![]() If image Larger than
If image Larger than
![]() If image Smaller than
If image Smaller than
![]() If image in Landscape mode
If image in Landscape mode
![]() If image in Portrait mode
If image in Portrait mode
![]() If image Equal to
If image Equal to
![]() If image Not Equal to
If image Not Equal to
Save image in any case.
ON - Save file regardless of conditions.
OFF - Save only resized images.
3) Result tab.
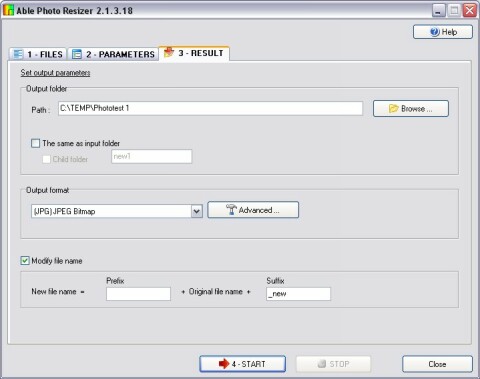
Specify parameters for saving: Output format and Output folder.
Click on the Browse button to select the folder where program will put resized images (or type the path manually in the corresponding field).
You can save your files in the same folder as input folder.
Child folder is subfolder for each folder.
To specify an output file type - select an appropriate extension in the "Output format" list.
Following Advanced output options are available:
JPG output settings include an ability to create a progressive JPG, ability to use optimal Huffman table.
PNG output settings include an ability to set PNG compression level and create an interlaced image.
TIF output settings include several compression types: No compression; Huffman; PackBits (RLE); CCITT Group 3, 1D; CCITT Group 3, 2D; CCITT Group 4, 2D; JPEG; LZW
BMP, TGA and PCX output parameters include an ability to create compressed file.
Modify file name: here you can set a prefix or suffix to be added to names of processed files.
There is other our program with extended features and command line parameters - Able Batch Image Converter.